
There’s something magical about enjoying a homemade treat that brings back memories of childhood. I still recall those hot summer days when I would rush home with an ice cream cone in hand, the chocolate and nuts creating a delightful crunch with every bite. Making Homemade Drumstick Cones is not just about enjoying ice cream; it’s about creating joyful moments that you can share with family and friends. I love this recipe because it lets you customize your cones with your favorite flavors and toppings. You get to unleash your creativity while enjoying a special treat that’s both nostalgic and delicious.
why make this recipe
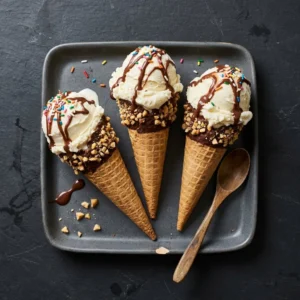
Creating Homemade Drumstick Cones is a fun and easy way to enjoy a classic dessert at home. You can control the ingredients to make them as special as you like. Plus, they’re perfect for parties, family gatherings, or just a cozy night in. By making them yourself, you ensure freshness and can cater to everyone’s taste preferences. This DIY approach not only saves money but also adds a personal touch that makes enjoying ice cream even better.
how to make Homemade Drumstick Cones
Ingredients:
- 1 package of ice cream cones
- 4 cups of your favorite ice cream
- 1 cup of chocolate chips
- 1 cup of chopped nuts (such as peanuts or almonds)
- 1/4 cup of chocolate syrup
- Sprinkles (optional)
Directions:
- Start by melting the chocolate chips in a microwave or double boiler until smooth.
- Dip the top of each ice cream cone into the melted chocolate, allowing any excess to drip off.
- Immediately sprinkle the chopped nuts over the chocolate coating.
- Allow the chocolate to set in the refrigerator for about 15 minutes.
- Once the cones are ready, scoop your favorite ice cream into each cone, packing it tightly.
- Drizzle chocolate syrup over the ice cream and add sprinkles if desired.
- Serve immediately or freeze for later enjoyment.
how to serve Homemade Drumstick Cones
To serve your Homemade Drumstick Cones, arrange them on a plate or in a tall glass for a fun presentation. You can drizzle additional chocolate syrup or add more sprinkles on top for extra flair. They are best enjoyed fresh, but if you have extras, you can offer them at family movie night or outdoor gatherings.
how to store Homemade Drumstick Cones
If you have leftovers, place the cones in an airtight container, separating them with parchment paper to avoid sticking. Store them in the freezer for up to a week. When you’re ready to enjoy them again, just take them out and let them sit for a few minutes before serving.
tips to make Homemade Drumstick Cones
- Use a variety of ice cream flavors to keep things interesting.
- Experiment with different types of nuts or toppings to customize your cones.
- Make the chocolate coating a bit thicker by using more chocolate chips or letting it cool slightly before dipping.
- If you want to avoid melting ice cream, work quickly when assembling the cones.
variation
You can create a variety of flavors by using different types of ice cream such as mint chocolate chip or strawberry. Additionally, try adding caramel sauce instead of chocolate syrup or using crushed cookies for a different crunchy topping.
FAQs
1. Can I use any type of ice cream for this recipe?
Yes, you can use any flavor of ice cream you prefer, from classic vanilla to more adventurous options.
2. How do I prevent the ice cream from melting too quickly?
Make sure the chocolate coating is set completely before adding ice cream. You can also work quickly and keep the cones stored in the freezer until you’re ready to serve them.
3. Can I make these cones ahead of time?
Yes, you can prepare and assemble them ahead of time. Just store them in the freezer until you are ready to enjoy them.

Homemade Drumstick Cones
Ingredients
Main Ingredients
- 1 package ice cream cones
- 4 cups your favorite ice cream Use any flavors you prefer.
- 1 cup chocolate chips For melting.
- 1 cup chopped nuts Such as peanuts or almonds.
- 1/4 cup chocolate syrup Drizzle over the ice cream.
- to taste sprinkles Optional topping.
Method
Preparation
- Melt the chocolate chips in a microwave or double boiler until smooth.
- Dip the top of each ice cream cone into the melted chocolate, allowing any excess to drip off.
- Immediately sprinkle the chopped nuts over the chocolate coating.
- Allow the chocolate to set in the refrigerator for about 15 minutes.
Assembly
- Once the cones are ready, scoop your favorite ice cream into each cone, packing it tightly.
- Drizzle chocolate syrup over the ice cream, and add sprinkles if desired.
- Serve immediately or freeze for later enjoyment.