Ingredients
Main Ingredients
- 1 lb ground beef (preferably 80/20 blend for flavor)
- ¼ cup soy sauce
- 2 tablespoons brown sugar
- 1 tablespoon sesame oil
- 3 cloves garlic, minced
- 1 teaspoon fresh ginger, grated
- 1 teaspoon red pepper flakes adjust for spice preference
- 2 green onions sliced (for garnish)
- 1 cup broccoli florets (optional)
- 2 cups cooked rice (white or brown)
- Sesame seeds (for garnish, optional)
Method
Cooking
- In a large skillet over medium-high heat, add ground beef. Cook until browned, breaking it apart as it cooks (about 5–7 minutes).
- Drain excess fat if necessary, then add minced garlic and grated ginger. Sauté for an additional 2 minutes.
- Pour in the soy sauce, brown sugar, and sesame oil. Stir to combine and let it simmer for 3–4 minutes until the sauce thickens slightly.
- If using, add broccoli florets to the skillet. Cook until tender, about 3–4 minutes, stirring frequently.
- While the beef cooks, prep your rice according to package instructions if not already cooked.
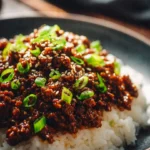
- In bowls, serve the cooked rice topped with the savory ground beef mixture.
- Finish with sliced green onions and a sprinkle of sesame seeds for an added crunch and flavor boost.
Nutrition
Serving: 1gCalories: 400kcalCarbohydrates: 45gProtein: 25gFat: 15gSaturated Fat: 5gSodium: 800mgFiber: 2gSugar: 6g
Notes
For a deeper flavor, try using fresh ground ginger and garlic instead of powdered forms. You can also swap out or add other vegetables like bell peppers or carrots to make it more colorful and nutritious. Leftovers can be stored in an airtight container in the refrigerator for 3-4 days or frozen for up to 3 months.
Tried this recipe?Tried this recipe? check me best Recipes
Elysium Recipes